サーバを立ち上げてからの手順④cakePHPの導入
cakePHPの導入方法について
cakePHP導入
cakePHP 2.8.6をダウンロード、展開
展開フォルダを公開ディレクトリ名にリネイム
インストール
$ wget https://github.com/cakephp/cakephp/archive/2.8.6.tar.gz
$ tar xzvf 2.8.6.tar.gz
$ mv cakephp-2.8.6/ www
$ cd www
cakePHP設定
パーミッションの変更とセキュリティソルト変更
$ chmod -R 777 lib/Cake/Cache/
$ cd app
$ chmod -R 777 tmp/
$ vi Config/core.php
228行目、233行目の文字列を変更する

アクセスして、以下のようなページが出ればOK

データベース接続
$ Console/cake bake
聞かれたことに対して答えていく
---------------------------------------------------------------
Database Configuration:
---------------------------------------------------------------
Name:
[default] >
Datasource: (Mysql/Postgres/Sqlite/Sqlserver)
[Mysql] >
Persistent Connection? (y/n)
[n] >
Database Host:
[localhost] >
Port?
[n] >
User:
[root] > ユーザ名
Password:
> パスワード
Database Name:
[cake] > データベース名
Table Prefix?
[n] >
Table encoding?
[n] > 文字エンコーディング(例:utf8)
で、サイトを見たら、以下のようになればOK

[参考]timezoneの変更
サイトを見たときに
Warning: strtotime(): It is not safe to rely on the system's timezone settings. You are *required* to use the date.timezone setting or the date_default_timezone_set() function. In case you used any of those methods and you are still getting this warning, you most likely misspelled the timezone identifier. We selected the t....
と言ったwarningが出ていますが、これを解消するためには以下の方法を行います。
管理者権限でログインした状態で、
# vi /etc/php.ini
878行目のtimezoneの部分のコメントアウトを外して、Asia/Tokyoと入力

webサーバを再起動
# systemctl restart httpd.service
すると、サイトの方のwarningが消えました。

サーバを立ち上げてからの手順③DB編
サーバを立ち上げてからの手順、DB編です
DB環境のインストール
リポジトリの利用
CentOS7のデフォルトDBはMariaDBですが、MySQLを利用していきます。
# yum -y install http://dev.mysql.com/get/mysql-community-release-el7-5.noarch.rpm
MySQLの利用
# yum install mysql-server
何か聞かれたら、基本的に全てyes
起動、自動起動設定
# systemctl start mysqld.service
# systemctl enable mysqld.service
phpMyAdminのインストール
# yum --enablerepo=epel install phpMyAdmin php-mysql php-mcrypt
あとは、以下のサイトを参考に・・・
Cloud Computing System.lab: CentOS7 phpMyAdminのインストール
ユーザ作成
phpMyAdminでのユーザ作成
phpMyAdminでログイン後、User->Add user

サーバを立ち上げてからの手順②追加:ユーザディレクトリアクセス方法変更
ユーザディレクトリアクセスは、現在、http://IPアドレス/~ユーザ名/ になっていますが、~いやですよね
その時は、
# vi /etc/httpd/conf/httpd.conf
に以下を追加すればOKです。
<VirtualHost *:80>
    ServerAdmin メールアドレス
    DocumentRoot /home/ユーザ名/www/
    ServerName サーバ名
    ErrorLog logs/******-error_log
    CustomLog logs/******-access_log common
</VirtualHost>
すると、ServerNameに書いたものでアクセスできます。
サーバを立ち上げてからの手順②ユーザ発行編
今回はユーザ発行編です。
ユーザ発行
ユーザ発行
# useradd ユーザ名
ユーザパスワード設定
# passwd ユーザ名
ののち、2回パスワードを入力すればOKです。

ユーザ確認
ユーザが発行できているかは
# cat /etc/passwd
で確認できます。一番下に、ユーザ名が書かれていればOK

サーバを立ち上げてからの手順①webサーバ、PHP編
サーバ(CentOS 7)を立ち上げてからの手順を書いていきます。今回はwebサーバ、PHP編
サーバ概要
サーバ概要を確認するには、以下のコマンドで確認可能です
# cat /etc/*release
CentOS Linux release 7.3.1611 (Core)
NAME="CentOS Linux"
VERSION="7 (Core)"
ID="centos"
ID_LIKE="rhel fedora"
VERSION_ID="7"
PRETTY_NAME="CentOS Linux 7 (Core)"
ANSI_COLOR="0;31"
CPE_NAME="cpe:/o:centos:centos:7"
HOME_URL="https://www.centos.org/"
BUG_REPORT_URL="https://bugs.centos.org/"

CENTOS_MANTISBT_PROJECT="CentOS-7"
CENTOS_MANTISBT_PROJECT_VERSION="7"
REDHAT_SUPPORT_PRODUCT="centos"
REDHAT_SUPPORT_PRODUCT_VERSION="7"

CentOS Linux release 7.3.1611 (Core)
CentOS Linux release 7.3.1611 (Core)
[参考]
Linux OSの種類とバージョンの調べ方 - Qiita
CentOS、UbuntuなどLinux OSのバージョン確認をするコマンド | UX MILK
Webサーバ(Apache)のインストール
インストール
# yum install httpd

Complete!が最後に表示されればOK!
起動
# systemctl start httpd.service

再起動の場合は、
# systemctl restart httpd.service
cronでプログラムを自動的に定期的に動かす
cronでプログラム(今回はpython)を自動的に動かす方法を書いておきます。
cronとは?
cron とは、ジョブ(スクリプト)を自動実行するためのデーモンプロセスです。
cron の設定ガイド
ということで、自動的にそして定期的にジョブ(プログラム)を実行するときに便利なものです。
cronの登録
プログラムの場所確認
まず、動かしていきたいプログラムの場所(フルパス)を確認します。
今回私は、"/home/ユーザ名/FLG/FDB.py" を動かしていきます。
このとき、コマンドで叩いて実行できるか試してみましょう。今回私は、anacondaで作成したpythonプログラムを実行したいので、以下のコマンドで実行できるか試してみました。
/home/ユーザ名/anaconda3/bin/python3 /home/ユーザ名/FLG/FDB.py
cronの登録
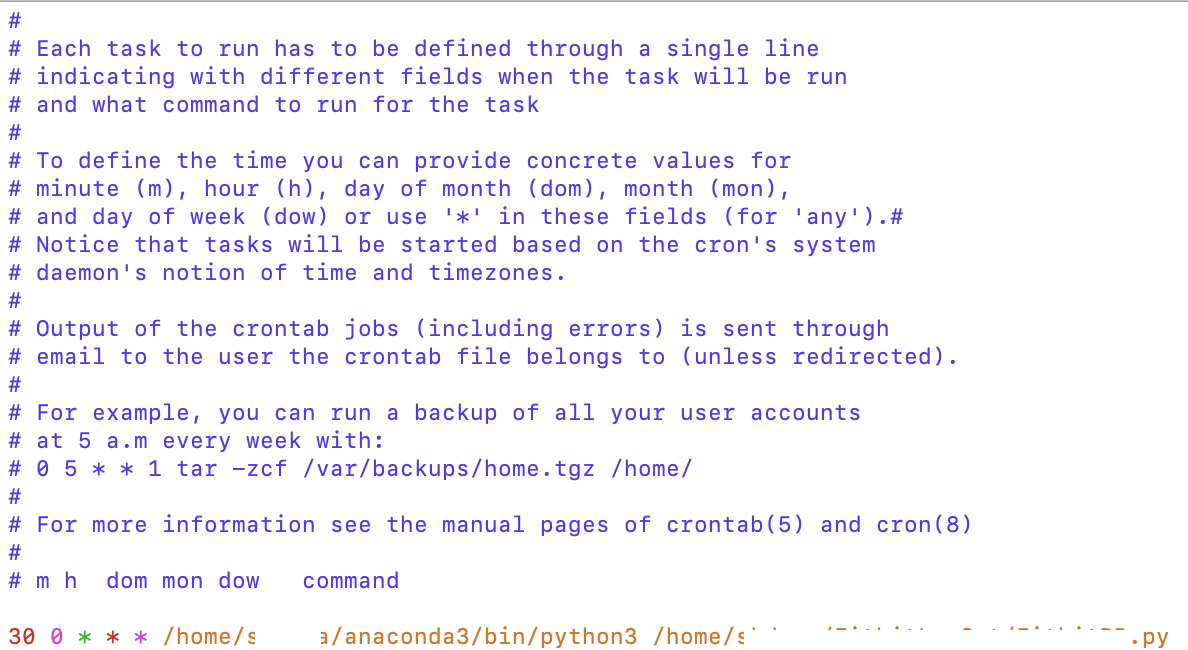
cronの登録には以下のコマンドを実行します。

crontab -u ユーザ名 -e
今回、1日に1回(00:00:30に)実行したいので以下のように書き込みます。

30 0 * * * /home/ユーザ名/anaconda3/bin/python3 /home/ユーザ名/FLG/FDB.py
時間登録の部分については、以下のサイトがとてもわかりやすいので参考にしてください。
cronの日時指定を、基礎から学ぶ(分,時,日,月,曜日の指定、◯分ごと、月末起動、など) - YoheiM .NET
FitbitのAPIを使う(2)APIをpythonで叩く準備
crulで叩いて情報を取得してもいいのですが、今回結果をDBに保存したいということもあり、pythonを使うことにしました。
今回はPythonで情報を取得するための準備です。
python-fitbitの準備
git clone https://github.com/orcasgit/python-fitbit

cd python-fitbit
sudo  pip3 install -r requirements/dev.txt
requests requests-oauthlibを入れる
pip install requests requests-oauthlib

終わり!
Jupiterで行ったので、一応gistに載せて共有します。


